Whether you find yourself in the role of host or guest, what better way to set the tone of a dinner party than with an exquisitely arranged table? As the host, you have fulfilled your role in creating an ambiance and atmosphere consistent with the special evening you have meticulously planned and organized for your guests. As a guest, you can observe the care, consideration, and effort your host has invested in ensuring your time with them is enjoyable, comfortable, and memorable.
With the holidays approaching, many individuals will spare no effort in setting their tables with the utmost care, using their most refined and formal settings. Whether assuming the role of host or guest, this article illustrates various table settings, ranging from the most common everyday arrangements to the most formal, providing a reference and review to assist you with getting things just right. In addition to familiarizing yourself with the placement of items, you will also gain insights into when and why to use specific items.
It is our hope that this article provides precisely the information you seek. However, if you’re still left with questions, please let us know via the comments or email. We’ll expand the illustrations and the content of this article to address any queries you may have.
-
Planning the Meal and Seating Arrangements
Before getting started on creating place settings, it’s essential to give some thought to what you will serve, what will be needed, and for how many guests. If you, as the host, will have a guest of honor at your event, this individual should be seated to your right. Hosts, e.g., a couple, traditionally will sit opposite one another at the heads of the table. If there is a second guest of honor, the second guest would be seated to the other host’s right. See a visual representation below.
Following traditional etiquette, female guests of honor take their place to the right of the host, and male guests of honor to the right of the hostess. The spouse of a female guest is typically situated to the left of the host, while the spouse of a male guest is placed to the left of the hostess. If you are presented with a circumstance where the hosts and/or the guests of honor are of the same sex, keep the overarching guidelines in mind and make your decisions accordingly. Other esteemed guests find their seats in close proximity to the host or hostess. In scenarios with a solitary guest of honor and the host unaccompanied by a spouse, the guest of honor may be seated at the opposite end of the table. In events with multiple tables, the host usually occupies one, and the hostess another, adhering to the same principles for guest seating. All this being said, it is important to note that in the absence of a guest of honor, these mentioned seats continue to function as ordinary seats for any guest to take according to the host’s seating plan. It is only in the presence of a guest of honor that these seats at the table are “elevated” in status.
Once you have developed your menu, you’ll then be in a position to select the utensils, dishware, and serveware needed for your dinner party.
Seating Arrangements Visual
-
Basic, Everyday Table Setting
There is no necessity to pull out your finest China or crystal to achieve a proper and simple everyday table setting. The appropriateness of a table setting is less dependent on the material of the items and more on the arrangement thereof. Of course, you can use your most casual to your most refined dishware if you would like; just be certain to put care and consideration into making it nice for your dining companions.

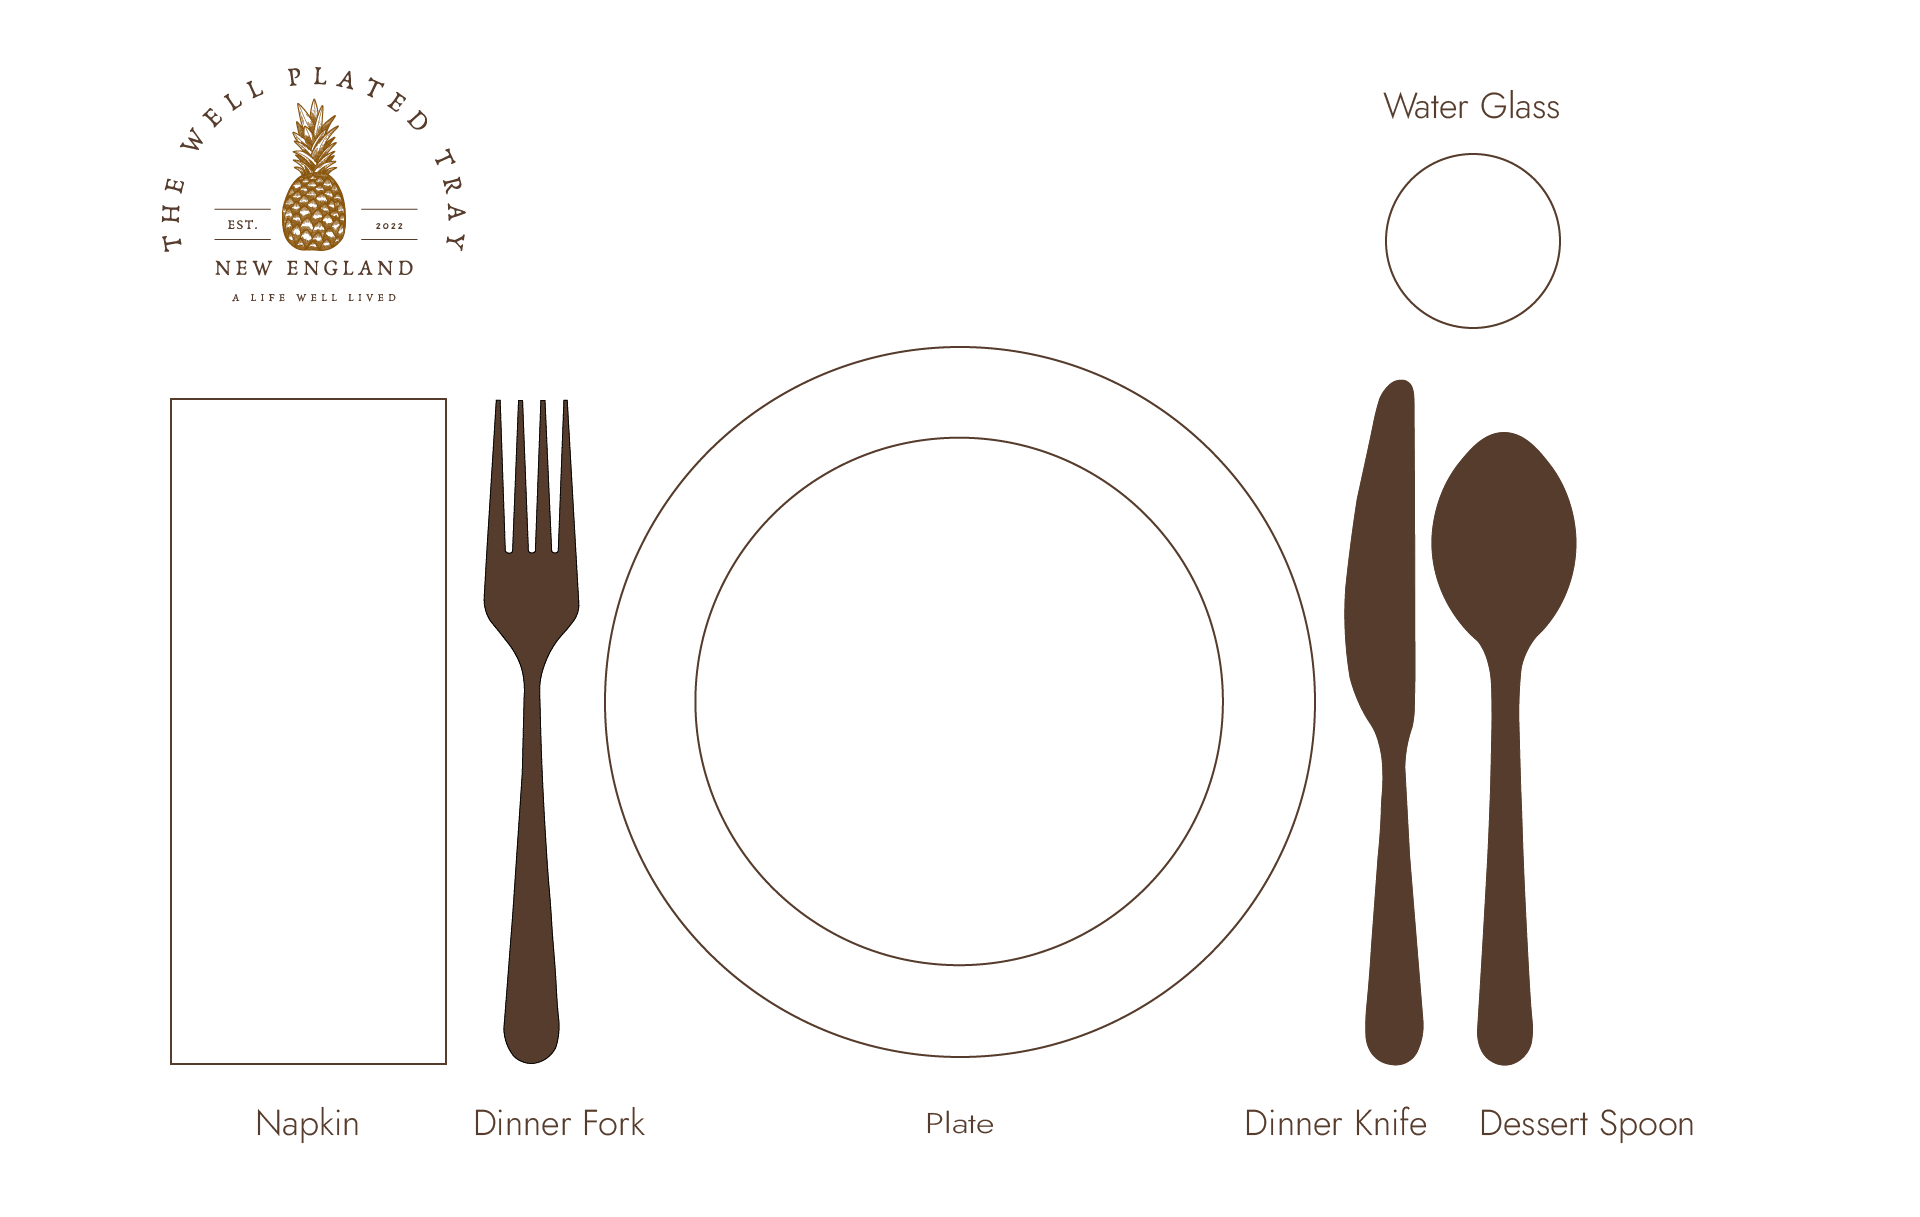
Above is an illustration of a simple, everyday table setting for a two-course meal, such as a week-night dinner. We see here that there will be a main course and dessert, along with a beverage of some sort—this could be water, juice, etc. All that’s needed to achieve this are the following items: dining utensils (dinner fork, dinner knife, dessert spoon), a dinner plate, a water or drinking glass, and a napkin.

Basic, Everyday Table Setting Instructions
-
-
Set the dinner plate where the guest will be seated.
-
Place the dinner fork to the left of the dinner plate.
-
Place the napkin to the left of the fork.
-
Place the dinner knife to the right of the dinner plate (make sure the blade of the knife is facing the plate).
-
Place the dessert spoon to the right of the dinner knife.
- Place the drinking glass above the knife and spoon.
-
Basic, Everyday Table Setting Etiquette Tip:
Introducing your little ones to the fundamentals of table setting through the basic arrangement is a valuable opportunity. This practice helps them become acquainted with the utensils used, fostering comfort in dining experiences both at home and in various settings. Developing this skill goes beyond mere practicality; it cultivates the idea that dining together at the table transforms into a special occasion, elevating the act beyond the routine of daily meals. Family dinners then become cherished moments, providing the pleasure of each other’s company to be savored and celebrated.
-
Casual, Informal Table Setting
Upon comparing the basic, everyday table setting to the casual, informal table setting, you will notice minimal difference between the two. The casual, informal table setting slightly elaborates on the basic, everyday table setting by incorporating a few additional items. Acquiring the skill to set your table in this style proves beneficial for gatherings and informal dinner parties.
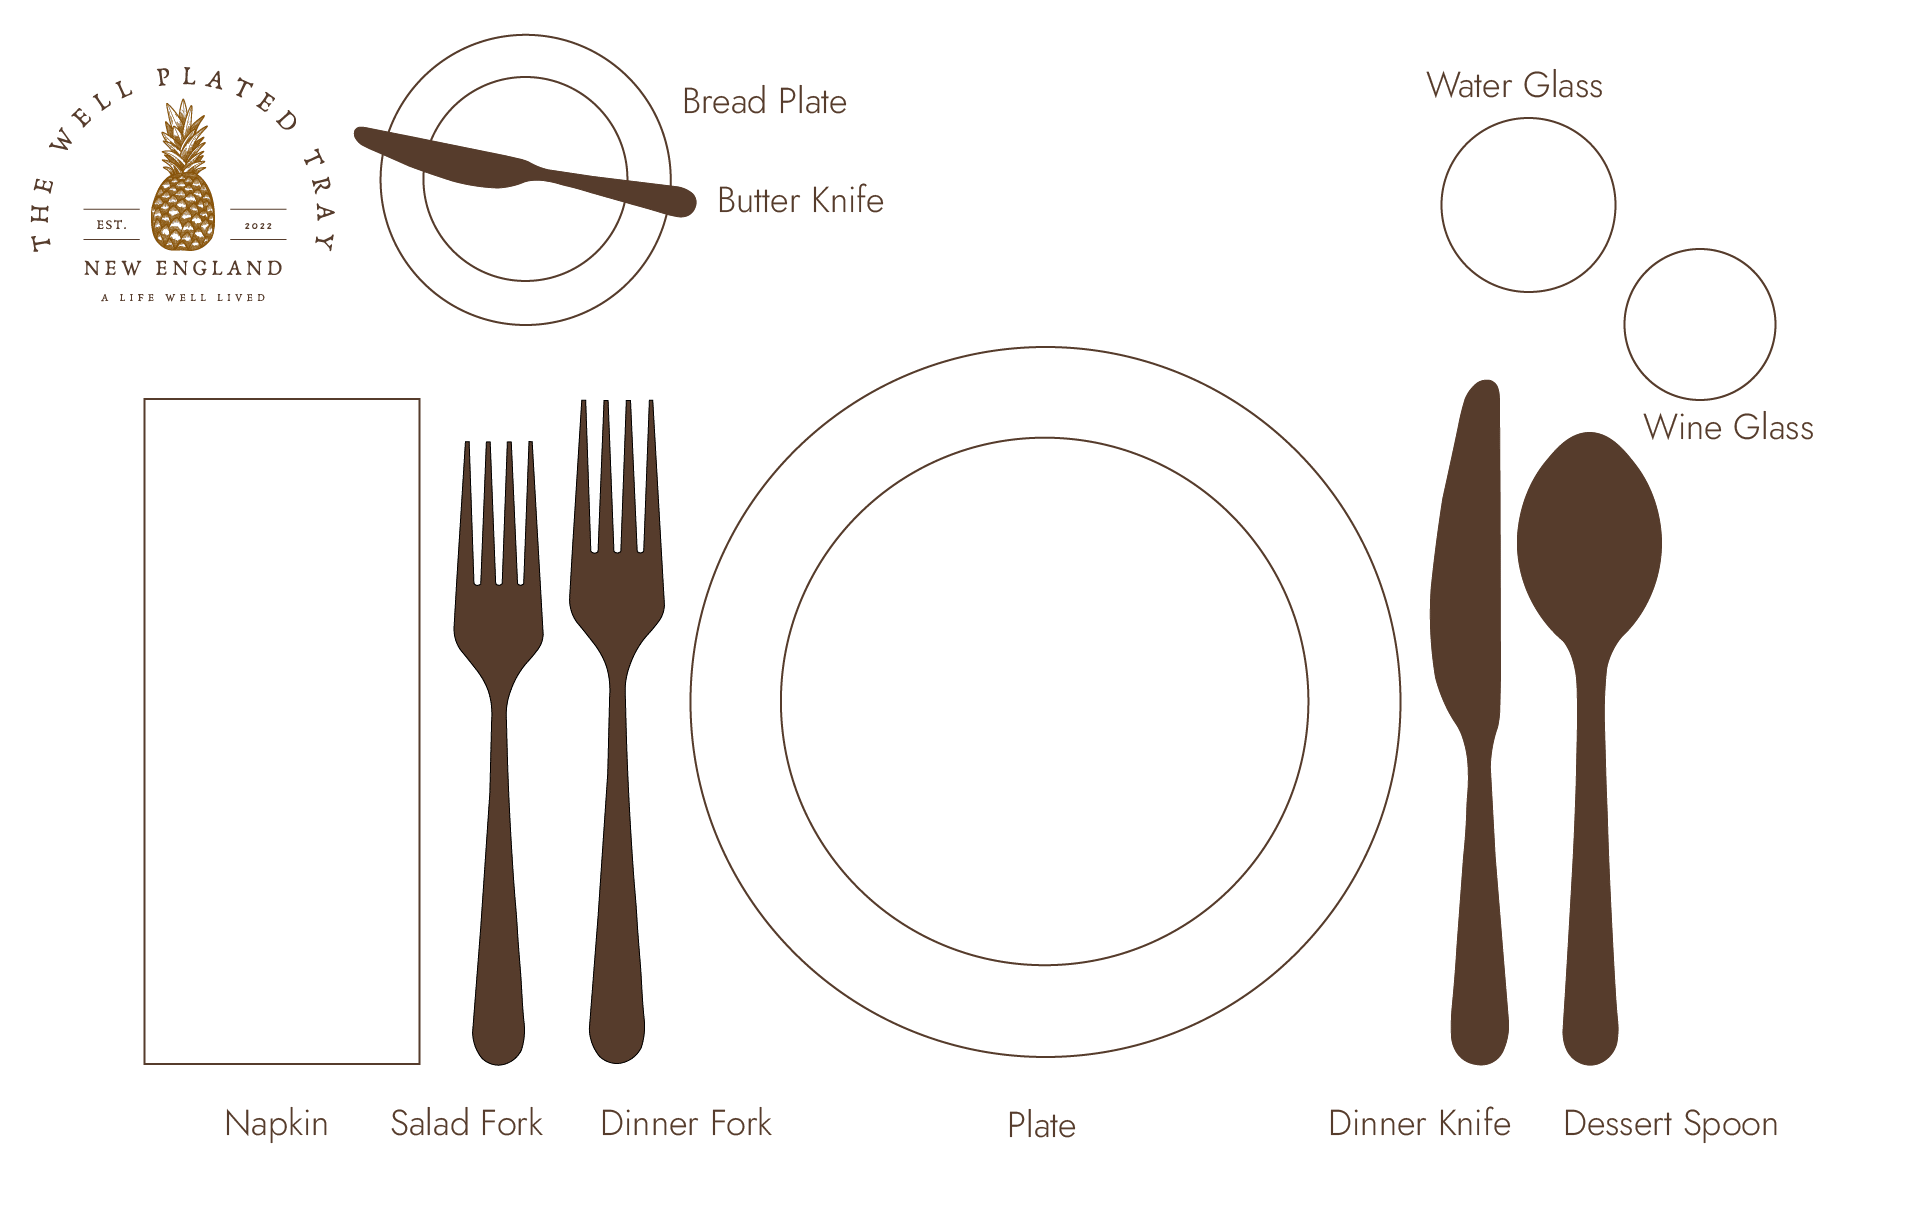
As demonstrated by the above illustration, we understand that a three-course meal will be served. We see here that bread will be served along with a first-course appetizer or salad, main course, dessert, and two beverages—water and wine.
Casual, Informal Table Setting Instructions
-
-
Set the dinner plate where the guest will be seated (optional)
-
Place the dinner fork to the left of the dinner plate.
-
Place the salad fork to the left of the dinner fork.
-
Place the napkin to the left of the salad fork. (Note that it is also acceptable to use a napkin ring or place the napkin atop the dinner plate.)
-
Place the dinner knife to the right of the dinner plate (ensure the blade of the knife is facing inward toward the plate).
-
Place the dessert spoon to the right of the dinner knife.
-
Place the bread plate above the forks.
-
Place the butter knife either diagonally with the point facing the upper-left or horizontally across the top of the bread plate.
-
Place the drinking glass above the knife and spoon at a 45-degree angle.
-
Place the wine glass below and to the right of the drinking glass such that it cascades diagonally downward as pictured.
-
You may be wondering if there is any flexibility with this setting if you intend to serve other dishes, such as soup. Or, maybe you want to serve the salad after the main course instead of before. Of course, it is possible to make these adjustments; simply set the dining utensils and dishware according to what you will serve your guests. Bread isn’t a requirement for the casual, informal table setting; it is included in this example because it was an additional item the host elected to serve in this instance.
-
Formal Table Setting
Now that we’ve covered how to set the table for everyday and informal dining situations, let’s now shift our focus to elevating the dining experience into the realm of formal sophistication. You may be curious, “What distinguishes a place setting as formal compared to basic or informal?” In the context of place settings, this implies a table arranged for a more elaborate feast, typically encompassing four to six courses, adorned with your most refined settings.
For a formal repast, a minimum of four courses is customary, each accompanied by the necessary dining utensils, dishware, and glassware. The occasion calls for the grandeur of your most elegant dishware and glassware. This is also the time for place cards; where careful consideration has been given to the seating arrangement. You will have given great thought to where your guests will be seated and who will enjoy each other’s company, fostering an atmosphere of comfort, engagement, enjoyment, and overall pleasantness.
It’s a common and appropriate practice to refrain from seating individuals who frequently share company, such as a couple, side by side. The aim is to enhance their experience by encouraging interactions with others they may not encounter as regularly, as it would be more enjoyable for them to get to interact and spend time with others they comparatively don’t see as often. Let the dining affair unfold with the grace and charm that formal settings bring to the table.
As for other details, Emily Post says, “Everything on your table should be crisp and sparkling. White linens are still considered the most formal, but colored or patterned tablecloths, napkins, and place mats can be just as elegant. Other possible elements are candles, a centerpiece or multiple arrangements, and place cards. […]
“The most formal table is strictly symmetrical: centerpieces in the exact center, an even number of candlesticks, place settings spaced evenly around the table, silverware lined up and at the same distance from the edge of the table. However, feel free to vary flower arrangements and decorations as you like, creating a balanced and pleasing tablescape.” 1
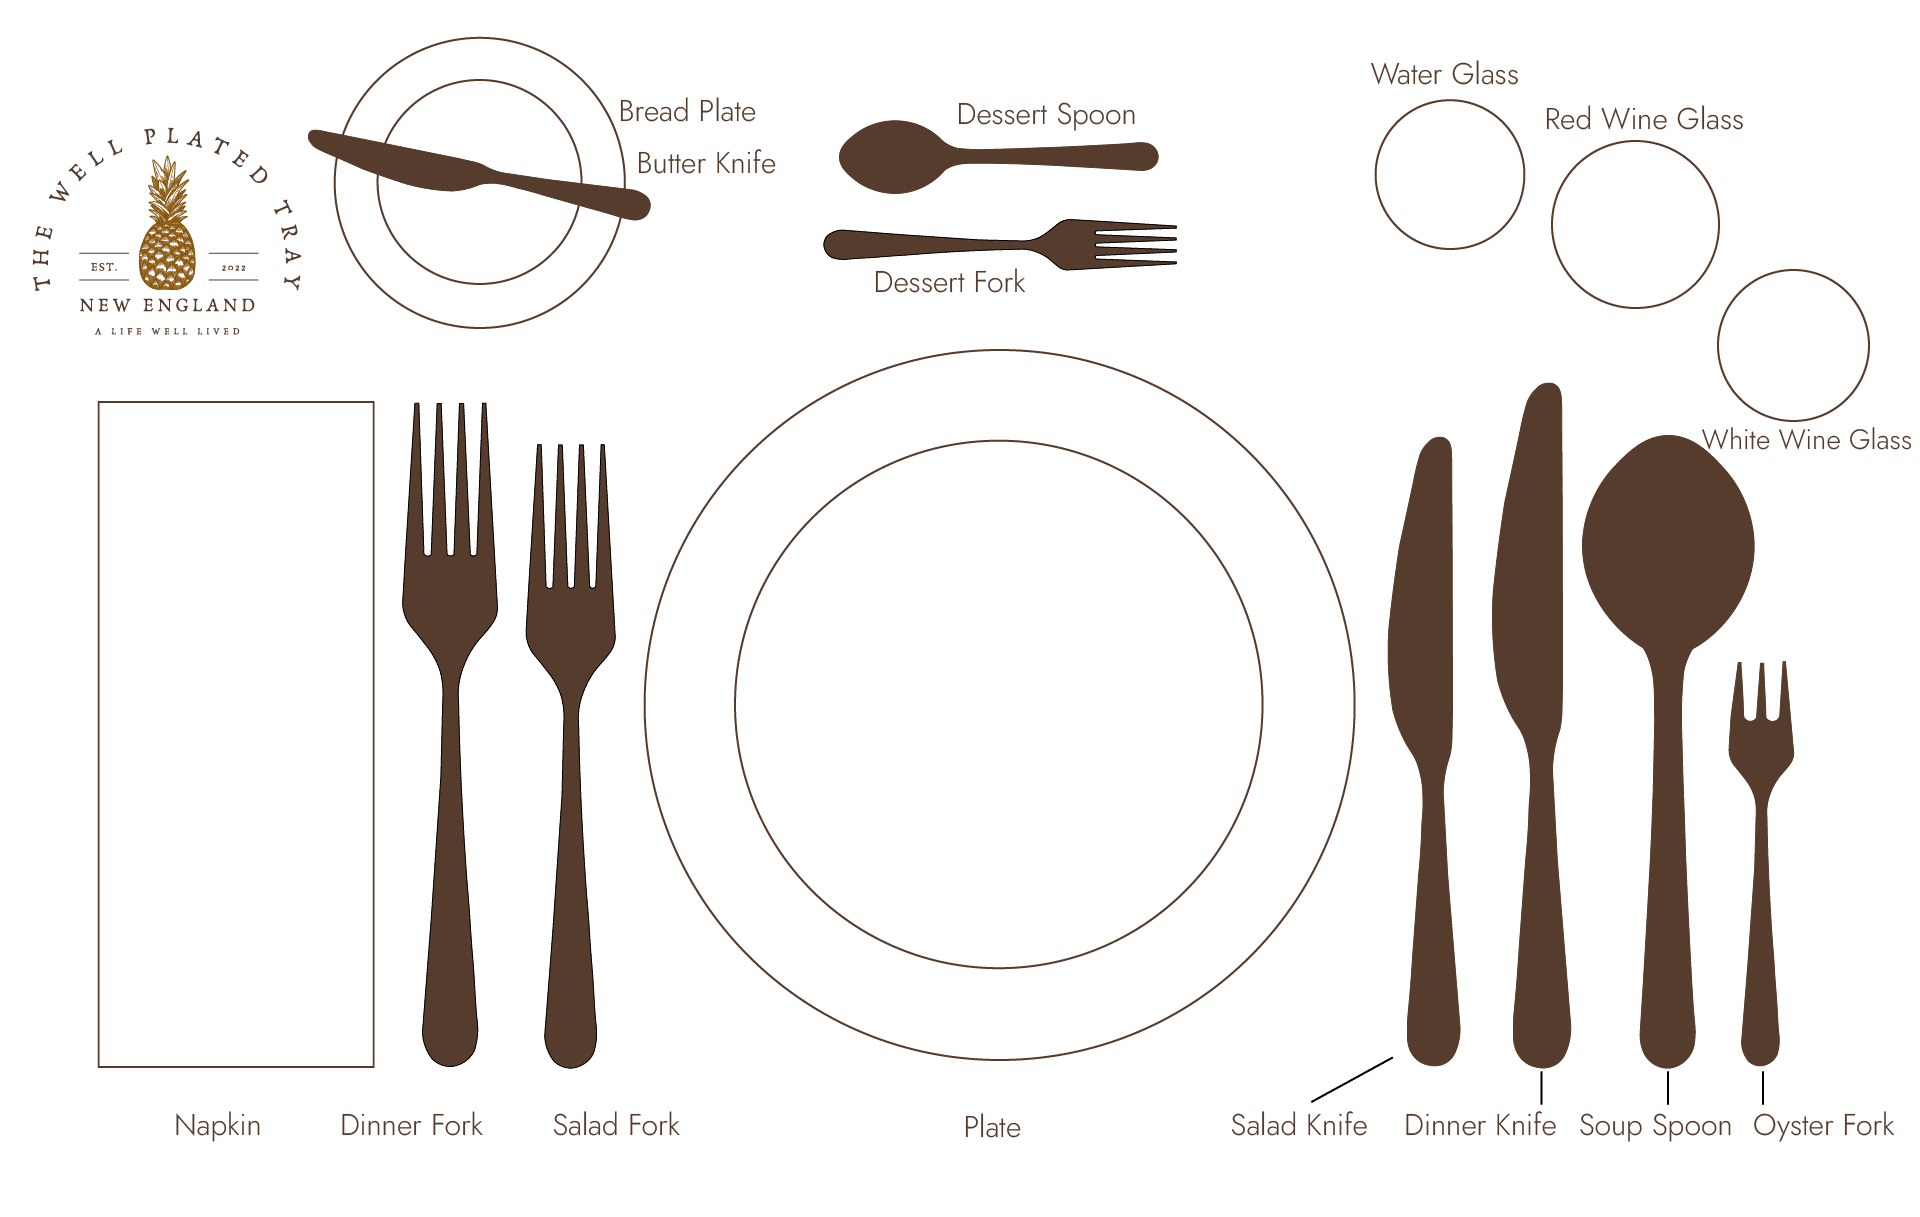
As demonstrated by the above illustration, we understand that a formal five-course meal will be served. We see here that bread will be served along with a first-course seafood appetizer, followed by a soup course, main course, salad, and dessert. We also see that three beverages will be served; the glasses are displayed in the order in which the beverages will accompany the meal. Nearest to the guest is the white wine glass, which will be served first. Following the white wine glass is the red wine glass (the middle glass pictured), which will be used second. Furthest from the diner and above the knives is the water glass, which will be used throughout the meal.
You may find yourself asking about the placement of the salad utensils and why they are the innermost placed utensils. The reasoning is quite logical and simple; they are placed where they are because the salad course will follow the main course and will be the last course served before the dessert. If you instead seek to serve a salad course before the main course, then you would simply interchange the salad course utensils with the dinner fork and dinner knife so that they precede the dinner fork and knife on each side. Looking at our illustration, you would instead see the following (left to right): napkin, salad fork, dinner fork, plate, dinner knife, salad knife, soup spoon, and oyster fork.
In this formal table setting illustration, the dessert utensils are positioned at the top of the place setting. If electing to use this style of placement, the dessert spoon is always placed above the dessert fork as shown in the illustration. Alternatively, the dessert utensils can be brought to the place setting when dessert is served.
The Finer Details
Now that we have identified all the items that compose this place setting, let’s delve into some of the finer details. While each of the former illustrations shows a plate set at the table, it is important to note that with a formal place setting you can expect to encounter what is called a service plate, charger plate, or place plate. A service plate is a large decorative plate that is part of a table setting but is not used for serving food. It is typically placed at each place setting before the meal begins and is meant to add a decorative touch to the table.
During the course of the meal, actual plates are placed on top of the service plate and used for serving each course. The service plate acts as an elegant base, providing a decorative foundation for the table setting. It remains on the table for the duration of most of the meal and is removed just before the main course is served, leaving the individual dinner plates to be used for the remainder of the meal. In the case of our illustration, the service plate would remain on the table throughout the soup course, after which it would be removed and replaced by the main course plate.
Service plates come in various materials, styles, and designs, and are commonly used in formal dining settings or during special occasions to enhance the overall aesthetic of the dining experience. While not required, if using them, a formal table setting is the time to do it.
Whether or not you elect to use a service plate, it is important to call our attention to the need for underplates with certain served dishes, especially in the absence of a charger. Using our formal place setting example illustration, if we were to skip the place plate when serving our soup course, we would need to include an underplate to accompany the soup bowl/soup plate. The purpose of an underplate is both to catch any drips and to serve as a place to rest utensils while taking a pause or upon finishing the dish, preventing us from soiling the dining table.
Formal Table Setting Instructions
-
- Set the service plate where the guest will be seated (optional)
- Place the salad fork to the left of the dinner plate.
- Place the dinner fork to the left of the salad fork.
- Place the napkin to the left of the dinner fork. (Note that it is also acceptable to use a napkin ring or place the napkin atop the dinner plate.)
- Place the salad knife to the right of the dinner plate (ensure the blade of the knife is facing inward toward the plate).
- Place the dinner knife to the right of the salad knife (ensure the blade of the knife is facing inward toward the plate).
- Place the soup spoon to the right of the dinner knife.
- Place the oyster fork to the right of the soup spoon.
- Place the bread plate above the forks.
- Place the butter knife either diagonally with the point facing the upper-left or horizontally across the top of the bread plate.
- Place the drinking glass above the knives at a 45-degree angle.
- Place the red wine glass below and to the right of the drinking glass (and above the dinner knife and soup spoon) such that it cascades diagonally downward as pictured.
- Place the white wine glass below and to the right of the red wine glass (and above the soup spoon and oyster fork) such that it cascades diagonally downward as pictured.
- Set the service plate where the guest will be seated (optional)
As always, if you have any questions, please give us a shout in the comments below or via email at hello@thewellplatedtray.com.
—
We’re writing minimalists. We believe in getting straight to the goods! No long, drawn-out stories. No rambling. No intrusive ads or banners; we believe in quality content without distraction. (More on that here.) We believe in good pointed conversation. Want to know more? Ask! Share your thoughts and questions with us in the comments! Let’s chat!
Related: Wellfleet Oysters